Final progress on Raspbery Pi Node Red project and Amazon Echo

These are pictures of the project starting with one LED connected to all 3 LEDs connected into the bread board and the Raspberry Pi and what the node red program looks like to make these LEDs act like

stoplight.

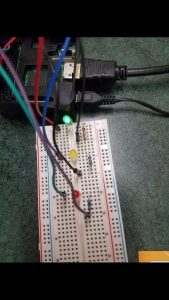
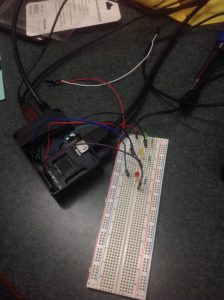
Finally after weeks we got the node red local host website to work so we continued working on node red and we ended up making a stoplight type thing with a green, yellow, and red LEDs. What I had to do was figure out how to connect all 3 LEDs to the bread board simultaneously and then learn how to power them on and off on a timer. What I need up dong was connecting the LEDs 10 rows down from one another on the bread board as well as connecting the jumper wires and the resistors. This way each LED would have their own bread board slots that would work. After this I had to use the different GPIO ports for each LED. After I made sure that all the LEDs would power on and off using a switch method using node red I connected all of the LEDs and started to figure out how to power each on one after the other and making sure that they would also turn off when another one turned on. In node red I had to use 1 inject node to start the power output on the green LED. I then had to use 3 rpi gpio for each of the LEDs. I also used 4 change nodes and 3 delay nodes in order for this to work properly. After I figured all this out I had the lights on a 15 second timer the green turns on for 5 seconds and then shuts off, as the green one shuts off the yellow LED would turn on and after 5 seconds it would turn off and the red LED would power on and shut off after 5 seconds.


We also worked on the Amazon Echo which ended up working perfectly. All you had to do was ask Alexa a question starting by saying Alexa. She could tell jokes, tell us the time, she could also tell us the weather. We ran I to some problems because she wasn’t working at first but after we realized that she couldn’t hear us we had to switch what type of port we were using to talk to her. It only took a little bit to figure this out and after that it worked perfectly. The only thing that we couldn’t do with Alexa was make it so it was linked with airplay. The reason we could not do this was because we needed a network adapter. This is because the phone would not be able to connect to the Alexa due to it being connected with an Ethernet cable. The phone would need something to connect to wirelessly which is where the network adapter would come in, but since we do not have a network adapter the Raspberry Pi can only be connected through the Ethernet cord.

Week 2 Raspberry Pi

This week we completed the node red activity with the lights and took pictures of the project 

we first had to plug in the light, the transistor, and the button into the bread board. After we plugged in all the wires in the correct spots into the bread board Andy the raspberry pi machine. Unfortunately we could not take pictures of the node red set up on the chromium web browser because the local host:1880 would not let us connect to it. We had the button working where the light was off until we clicked down the button but couldn’t get that to work do to the local host not letting us connect to it. The rest of the week we will be starting on the Alexa project turning the raspberry pi machine into the amazon echo machine.

I learned how to properly use node red to make lights turn on and off and how to connect the wires from the bread board and the raspberry pi. With this we could make a timed light or we could use multiple lights and make something like a stop light .

Raspberry pi progress

This week we started to work on learning the basics of the raspberry pi machine connecting wires and then using the raspberry pi software on the computer to turn the light on and off. When we got to the final step of actually turning the LED on and off we ran into trouble and the on and off “switches” wasn’t working. We found out that the reason it wasn’t working was because there was a communication error between the wires and the negative wire wasn’t communicating properly. We will be continuing to work on this LED learning project as the week goes on. I am doing this project because I want to learn more about technology. I want to learn how coding can be done and I think it will also be a fun learning experience for me. I hope that I develop an understanding of how to code as well as how things like raspberry pi really work. Since raspberry pi can do some many things learning how to code with it and use it could provide an exponential amount of benefits for maybe companies or a project that I want to be completed.

20% Project

img_0578 img_0576 img_0577

Today I was working on my 20% project which is skiing down a black diamond. Today I researched what different types of skis there are. I found out that skis with a narrow waist are best for groomed terrain or a mix of groomed and powder. I also found out that a wider waist is best for groomed runs and powder. And the final type of skis are skis for powder, back country and occasional groomed runs.